![]() By
Jon Eakes
By
Jon Eakes
 |
Can
a one-tooth saw possibly be worth $375?
When it will cut a hole for a six-inch rigid ventilation duct without twisting
your arm off… yes! .
When we first started
putting in HRVs in the '80s, we were stuck with the reality that the biggest
hole saw you could buy in the hardware store stopped at six inches - just
a quarter inch too small to fit that metal ducting through the hole. I even
talked Starrett into bringing in a 160mm (6-5/16-inch) hole saw from Europe
to help us out, but it never sold much because you had to weigh 300 pounds
to not find yourself spinning around the drill. All those teeth would bite
in and just sit there.
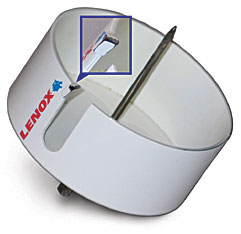
So this year Lenox made the first really major innovation in hole saws in
a long time. They realized that we often need a hole, but not a beautiful
hole. If you can accept a very rough cut, then you can use a single very wide
tooth. The carbide tooth on the 6-1/4-inch model is almost 5/16 inch wide.
The housing does not bind.
The chip clearance is
a monstrous gaping slot in the side of the saw: no clogging of chips. The
rim itself acts as a kickback guide that prevents it from biting more than
you can handle. With only one tooth, you actually maintain control of the
tool.
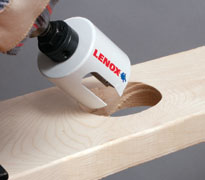
If you need 1-1/2-inch or two-inch holes cut on an angle, the one tooth design
allows for that as well. If it is not too flat an angle, just start crooked
and you will discover it is possible to seat the saw using a long spade bit
for the pilot. If you need a radical angle, drill it somewhat straight first,
then use the curve of the first hole to seat the housing for the angled cut,
as in the bottom-left photo. That single tooth design gives you a surprising
degree of control and you never have to back out to clear the chips.
They're called One Tooth Rough Wood Hole Cutters and they're sold in all self-respecting
renovation centres. See also: www.LenoxSaw.com.
How to destroy the
best of your blades
You may have figured it out by now, but when you take your mitre saw and chop
into laminate flooring with a silicone carbide or titanium finish, you are
lucky if your blade lasts to the end of the installation. First you need to
realize that the durable stuff in this finish is the same material used to
make grinding stones. So you are actually grinding your saw teeth with each
chop. If you are also using a standard wood cutting blade with pointed teeth,
you are wiping out the leading edge of the saw in the first few cuts.
The reality is that no saw manufacturer has yet figured out how to make a
blade that allows constant chopping directly into this kind of a finish. Freud
and others have made specific laminate flooring blades, but they won't last
if you don't learn new working habits.
First, you need to have a blade designed for cutting into composite materials.
The Alternate Top Bevel (ATB) designs just won't hold up to abuse. The Triple
Chip Grind (TCG) design has a solid tooth that hogs out most of the cut, and
then the finish tooth follows with a clean sweep, removing the little that is
left.

Next, you need to tackle
this material with a scraping action, not an aggressive bite that will cause
chipping; hence, the blade needs a negative hook angle. Now, neither of these
details are ideal for fine furniture grade cuts in wood, but they will cut
wood while working very well in composite materials such as masonite.
You have the right blade, but now you have to learn to use it properly. If
you strike flat on the surface of laminate flooring, you get that grinding
effect on the saw blade teeth. If you can stand the wood up, a chopping action
allows the saw to cut perpendicular to the tough surface, hitting very little
of the abrasive material at a time and saving the blade. If you are cutting
too wide a piece to stand up against the fence, then you must use either a
table saw, radial arm saw, or sliding mitre saw so that you can cut into the
piece with the blade perpendicular to the abrasive surface. For most of you
that means always cutting with a sliding mitre box, not a chop saw, and always
using the sliding stroke.
It doesn't normally matter that the blade is rising up out of the good surface
because cut ends generally go under the quarter round, but you could reverse
your boards for a smoother cut on the finish side. Freud's 10-inch 80-tooth
Laminate Flooring Blade lists for $130. See: www.Freud.ca.
High-tech joints
If I tried to sell you on dowels that cost $7 to $9 apiece, I don't think
I would get many of you too excited. But if I offered you a sturdy nut-and-bolt
system similar to knock-down furniture that could cinch up a joint with absolutely
nothing showing when it is tight - no plug, no caps, no putty, totally invisible
- you might get more interested. If, in addition, it was strong enough for
rails and banisters, at least those of you who build high-end houses might
take notice.
Lamello, no small start-up
company, has brought out the INVIS" fastening system. You start with a
doweling type of jig to drill precision matching holes. Then you insert the
nut in one and the bolt in the other. Then you put them together and approach
with a small attaching device that appears to do nothing at all. What happens
is that a magnet in the driver spins, creating a rotating magnetic field that
causes the magnetized swivel part of the connector hidden inside your work of
art to spin as well and tighten the joint, very tight indeed. Simply reverse
the driver and it will loosen the joint if you want to take things apart.

It was originally designed for knock-down industrial applications like kiosks
at exhibitions, but high-end home builders are finding it a great way to install
and maintain stair rails as well as designer partitions.
Kits with all the jigs, drills, drivers and fasteners you need to get started
run from $200 to $700. Check out the video at www.swissinvis.com
or contact the Canadian distributor at info@ibexent.com.
HB
Montreal-based TV broadcaster, author, home renovation and tool expert
Jon Eakes provides a tool feature in each edition of Home BUILDER.
www.JonEakes.com