 By
Jon Eakes
By
Jon Eakes
Old Tools Reinvented
Here are three tools that, while not necessarily new, are reinventing their classes. These tools are all about efficiency, they’re going to allow you to do the work you have to, with less strain on your arms and wallet.
What’s Pnew?
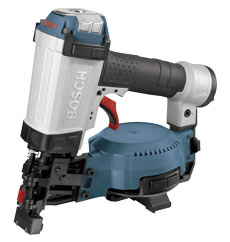
Bosch announced its entry into
pneumatic nailers by claiming to be smaller, lighter and more powerful than all those tools already in your tool box.
How could they accomplish this? Having no pneumatic heritage to defend, its engineers were free to reinvent pneumatics. Luckily for us, they used that freedom to zero in on an inherent power loss in traditional pneumatic technology.
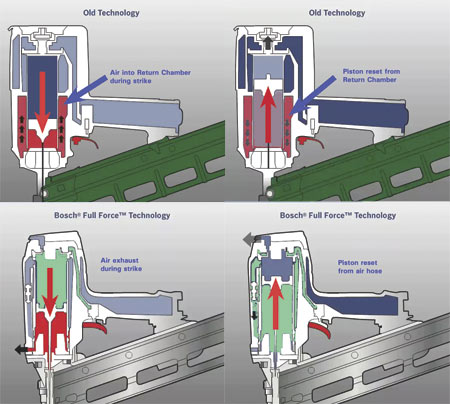
In traditional guns, as the hammer piston is driven forward by the compressed air, the air in front of the piston is squeezed into a side chamber. The air is then used to push the piston back up to its initial position. Bosch found that this diverted ten per cent of the energy available from the compressor away from driving the nail, so they decided to exhaust the air in front of the piston — giving them what they call “Full Force” to the nail. To get the piston back to the top, the Bosch nailer directs air from the compressor by using a small amount of hose line air while it is not needed to drive the nail. This also allowed them to make the tool 20 per cent smaller.
More power in less space and weight! A crowded field is about to get more crowded: the framing nailer is just hitting the market, and the roofing and finishing nailers are scheduled for release in the fall. Welcome to the party, Bosch.
Electrostatic Painting Becomes Affordable
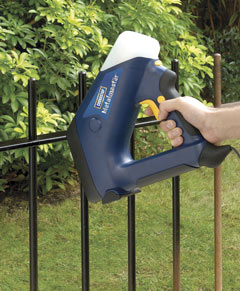
Electrostatic painting is certainly not new, but until now the cost of equipment limited its use to speciality painting contractors. Now, AkzoNobel (formally Sico) has brought out a battery-operated electrostatic spray system called the
Metalmaster.
To use it, you simply clip a grounding wire from the gun to the metal object and insert proprietary paint cylinders into the gun. Then, point and spray a misting cloud of paint that drifts all the way around narrow metal objects like railings, coating all sides evenly at the same time. It is the misty cloud nature of the paint, along with a high voltage static charge, that makes it work.
The gun sells for $65. Each can of paint sells for $25, but covers far more than a regular can of paint because it is 93 per cent high solids one-coat paint, rather than regular spray paints that are 30 per cent paint and 70 per cent propellant — not to mention that overspray is reduced to about 10 per cent. One can of Metalmaster covers about 39 feet of railing, 36” high.
It is available in four glossy finish colours (black, white, brown and grey) and one hammered finish colour (silver-grey).
Metalmaster Use Tips:
• Don’t work on a windy day.
• Completely use a can of paint without any long downtime that could dry and clog the nozzle — although you can seal the nozzle with aluminium foil for about 24 hours.
• Keep a set of batteries on hand. One set will last through about seven cans of spray.
• Have a rag and mineral spirits on hand for cleaning the exit chamber when finished.
• Connect the grounding clamp tightly to a clean part of the rail to insure good electrical conduction, and do not step on the cord as that will affect the static charge.
Wall Scopes Slither into Construction Market
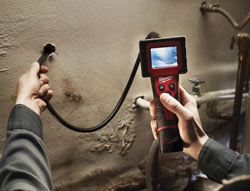
Small digital cameras can now be used to look into places where you can’t get your head: under sinks, in narrow attics and crawl spaces, even inside some walls. Just blindly point the camera and flash, and you get both a look and a record of what might be there. The best extension of this notion of looking where you cannot get your head is the use of fibre optics to make “scopes”.
Fibre optic scopes are basically a bundle of optical fibres bound into a cable, about two to four feet in length. A lens is attached on the front end, and a screen on the hand-held end. Lighting is either sent down a few of the fibers, or LEDs are attached to the head of the bundle to illuminate the lens’ focus. These instruments have been highly developed by the automotive and aerospace industry. They are now used to look into complex motor regions, even inside cylinders, without having to take anything apart.
Fibre optic scopes can range in price from a couple of hundred dollars, to several thousand, mostly depending on the clarity of the image that they give you at the receiving end.
Home inspectors have adopted them in a large way ever since we began to look for mold inside walls. Renovators have also discovered their usefulness in non-destructively identifying what lies behind objects they want to cut.
Construction wall scopes, or inspection scopes as they are often called, are now coming of age. For years I have used a simple ProVision model (www.ProVision100.com).
They come in 1/4” or 3/8” models, meaning that the shaft can go through small inspection holes, or cracks in the wall or floor. Bear in mind, the image is not perfect, and it takes a while to understand what you are seeing because it is often upside-down. My biggest frustration, however, is that I can see it after manipulating a bit to get just the right position and angle, but not necessarily show it to anyone else.
Last year, Milwaukee got into the game with its
M-Spector Digital Inspection Camera, which was not really a camera but rather an LCD display. Their light bundle on the end is considerably larger, and thus requires a 3/4” passage way for the scope.
Now there are many other brands and models available, but looking at these two will help to illustrate the rapidly changing field. ProVision has since developed a far higher resolution camera with both flexible and “obedient” (flex and stay in place) shafts called the PV2. In addition, they have come out with the camera coupler that I was hoping for. This allows many digital cameras to be screwed right to the end of the scope, so you see the image on your camera display and can snap that photo.
Not to be outdone, Milwaukee is working on a new version which will allow for recording photo and video, including sound, on a removable two gigabyte SD card. That new model should be released just about the time this issue hits your desk. These developments put various construction site models in the $250 to $600 dollar range, depending on resolution and photo capacity.
There is always a learning curve to using wall scopes, especially when it comes to figuring out what you are seeing. But higher resolutions and photo capture possibilities at prices far below the Aerospatiale instrumentation level is making this a tool renovators should consider adding to their tool box — both for guiding work and documenting it.